Customizing The Dispatch Grid Display
The Dispatch Grid can be customized to fit the needs of your company or even individual users in your company. This helps each user have the most vital information readily available to perform their assigned tasks.
TABLE OF CONTENTS
- Customizing The Dispatch Grid Display
- Navigating to Grid Setup
- Grid Setup Tab
- Date/Time Tab
- Conflicts Tab
- My Prefs Tab
- Company Prefs Tab
- Other Company Preference tab Dispatch Settings
Navigating to Grid Setup
- Click on the 'Dispatch' icon in the toolbar.
- Click 'Grid Setup' from the Dispatch screen.
A Pop Up window will appear with five tabs as illustrated below.
- Grid Setup: Determine the columns of data that are to be present, the width of each column, and the order in which the columns appear.
- Date/Time: Determine the date and time format, and the start and end time of the dispatch grid day.
- Conflicts: Switch the assignment conflict reminder on or off
- My Prefs: Determine the preferences for the individual system user including hiding jobs in certain statuses, enabling iGrid controls, and more.
- Company Prefs: Determine certain preferences that will apply for everyone in the company such as flagging reservations, and Driver Anywhere settings.

Grid Setup Tab
- Drag and Drop: You can drag and drop the different options (columns) to meet your needs. Dragging the option (column) to the top of the list will place the column to the left hand side of the dispatch grid while dragging it to the bottom of the list will place the column to the right hand side of the dispatch grid.
- Check box: A check in the box to the left of the option (column) label activated the column in your dispatch grid while no check in the box will remove it from your dispatch grid.
- Px size: The 'px' number box tells the grid how wide the column needs to be. The smaller/larger the number the smaller/larger width of the column will be.
Date/Time Tab
- Select the desired 'Date Format' from the drop down list.
- Select the desired 'Time Format' from the drop down list.
- Choose how often the dispatch grid will refresh to show current statuses of trips for that day from the 'Refresh Dispatch Every:' drop down list.
- Select and set to 'Yes' if the Dispatch grid is to refresh automatically after a payment is taken.
- Select the 'Start Time' and 'End Time' of the Dispatch Grid Day that best fits the company's business.
- Click the 'Update Dispatch Grid Fields' button.

- Select if the Switch Assignment Conflicts is 'OFF' or 'ON'. Enabling this feature (ON) creates a pop up advising if there is a conflict (Driver or Car) between two or more trips. See illustration below

My Prefs Tab
The chart below shows the settings available on the My Prefs tab of the Dispatch Grid Setup, the default setting, and a brief explanation of how each setting functions.
| Setting Title | Default Settings | Setting Options and Application (Graphics and Additional References where applicable) |
|---|---|---|
| Please select which statuses you would like to exclude by default when the grid loads | Select Options | Select any Statuses that are not to be shown on the Dispatch Grid. For Example if "Done" trips are not to be shown select "Done" from the drop down list. For more information please see the Knowledge Base article Customizing and Managing Trip Statuses for Your Business. |
| Enable iGrid options | No | Selecting 'YES' places a down arrow icon on the far left of the Dispatch Grid which functions identical to the action of 'right mouse click' on a PC or MAC. NOTE: This is required for iPad or other tablet devices where the 'right click' action is not possible. |
| Highlight Airport Runs? | No/No Color Selected | Selecting 'YES' and then selecting a color highlights all airport trips as determined by the pick-up/drop-off location to be highlighted with the chosen color. |
| Highlight VIP/VVIP Passenger Status? | No/No Color Selected | Selecting 'YES' and then selecting a color highlights all VIP/VVIP's as determined by the designation set on a Customer Account to be highlighted with the chosen color. |
| Show driver contact information on hover | Yes | Selecting 'YES' enables the driver contact information (phone and email address) to be displayed when the mouse pointer is placed over the driver name as illustrated below. Selecting 'No' disables this feature.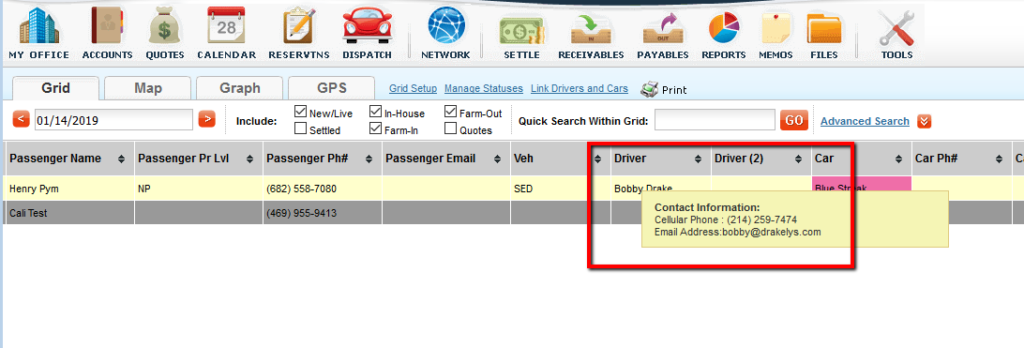 |
| Show Passenger contact information on hover | Yes | Selecting 'YES' enables the Passenger contact information (phone and email address) to be displayed when the mouse pointer is placed over the Passenger name. Selecting 'No' disables this feature. |
| Show Billing Contact information on hover | Yes | Selecting 'YES' enables the Billing Contact information (phone and email address) to be displayed when the mouse pointer is placed over the Billing Contact name. Selecting 'No' disables this feature. |
| Show Booking Contact information on hover | Yes | Selecting 'YES' enables the Booking Contact information (phone and email address) to be displayed when the mouse pointer is placed over the Booking Contact name. Selecting 'No' disables this feature. |
| Show Car information on hover | Yes | Selecting 'YES' enables the Car information is to be displayed when the mouse pointer is placed over the Car name. Selecting 'No' disables this feature. |
| Show Affiliate contact information on hover | Yes | Selecting 'YES' enables the Affiliate contact information (phone and email address) to be displayed when the mouse pointer is placed over the Affiliate name. Selecting 'No' disables this feature. |
| Mapping & Flight Tracking---Default Mapping Provider |  | Select the Default Mapping Link that is desired from the drop down list. Select from direct links to Google Maps, Mapquest, or Yahoo Maps. |
| Table Grid Setup---Font Color |  | Select the color desired for the text in the grid display. Default is black (#000). |
| Table Grid Setup---Border Color |  | Select the color desired for the borders in the grid display. Default is white (#FFFFF). |
| Table Grid Setup---Font Size |  | Enter a value for the size of the font and select if the value entered is in either pixels (px) (default), or points (pt). |
| Table Grid Setup---Row Height |  | Enter a value for the height of each row in the grid display, and select if the value entered is in either pixels (px) (default), or points (pt). HELPFUL HINT: the Row Height should be larger than the Font Size at a minimum 2 pixels or 2 points. |
| Table Grid Setup---Text overflow |  | Selection controls how fields that have text exceeding the size of that field will appear. Hide Excess Text will allow only what can fit in the grid field size as determined in Grid Set Up. Show All Text will automatically adjust the Row Height so that the complete text of that field can be shown. |
| Enable Batch Update | Yes | Selecting 'YES' places a check-box on the far left of each row to allow you to update multiple trips at once with the same value. The fields that can be changed via Batch Update are Status, Vehicle Type, Driver1, and Car1. When selected in a Dispatch Grid the Batch Edit window below will appear. Any changes made will apply to all selected (check box) trips when 'Batch Update Trips' is clicked. |
| Status Color Coding |  | Selection controls how the dispatch row is color coded based on the status. Select Entire Row (default) to color the entire row based on the Status with the exception of cells in columns for Vehicle Type or Car which may have there own specific color coding. Select Status Column Only to make the color coding for the Status only appear in the cells in the Status column. For more information on color coding statuses see the Knowledge Base article Customizing and Managing Trip Statuses for Your Business. |
Company Prefs Tab
The chart below shows the settings available on the 'Company Prefs' tab of the Dispatch Grid Setup, the default setting, and a brief explanation of how each setting functions.
Note: In order for these 'Flag' options to appear on the Dispatch Grid the column titled 'Special System Notification Flags' must be selected in the Grid Setup step above.
| Setting Title | Default Setting | Setting Options and Application (Graphics and Additional References where applicable) |
|---|---|---|
| Flag Reservations With Outstanding Balances: | No | Select "YES" or "NO": Selecting "YES" puts the flag code "BAL" in the flag column of the Dispatch Grid if the reservation is not paid in full. |
| Flag Reservations With Child Seats: | No | Select "YES" or "NO": Selecting "YES" puts the flag code "CS" in the flag column of the Dispatch Grid if the reservation has Child Seats requested. |
| Flag Reservations Booked Within: |  | Select an option from the drop down list: Selecting an option puts the flag code "LM" (Last Minute) in the flag column of the Dispatch Grid if the reservation was created less than the number of hours selected before pick up time. |
Other Company Preference tab Dispatch Settings
| Setting Title | Default Setting | Setting Options and Application (Graphics and Additional References where applicable) |
|---|---|---|
| Display DO and Spot Time in Quick Edit Form: | Yes | Select "YES" or "NO": Selecting "YES" adds the Drop Off Time and Spot Time fields to the Quick Edit Form accessed by right clicking the trip in the Dispatch Grid, or selecting the iGrid control icon, and selecting the "Quick Edit" option. |
Note: These settings are for companies utilizing the Driver Anywhere feature.
| Setting Title | Default Setting | Setting Options and Application (Graphics and Additional References where applicable) |
|---|---|---|
| Flag Driver Rejected Reservations; | No | Select "YES or "NO". Selecting "YES" adds a column to the dispatch grid on the left side that will be color coded.... Gray if a trip has been dispatched and the driver has not accepted or rejected it Red if a trip has been dispatched and the driver has rejected it Green if a trip has been dispatched and the driver has accepted it |
| Enable Driver Anywhere Messaging: | No | Select "YES" or "NO": Selecting "YES" enables sending a driver a message from the Dispatch Grid through Driver Anywhere by right clicking the trip in the Dispatch Grid, or selecting the iGrid control icon, and selecting the option "Send to DA". |
Click the 'Update Dispatch Grid Fields' button to save any changes
Was this article helpful?
That’s Great!
Thank you for your feedback
Sorry! We couldn't be helpful
Thank you for your feedback
Feedback sent
We appreciate your effort and will try to fix the article